This project has two main goals: To give you practice in implementing a linked-based structure and to illustrate the workings of a map (as an example of an abstract data type).
You already have worked with linked lists in CSCI 235 (or the equivalent), and we have reviewed them briefly in class. However, most students require a bit more practice at the beginning of CSCI 245 in order to have this programming technique mastered.
We have recently introduced the idea of an abstract data type
(ADT) in class.
One of the most important things to understand is how an ADT's
definition is independent of its implementation:
any ADT can have many implementations with very different underlying
implementation strategy.
For the map ADT we have seen in class two two implementations:
one using a HashMap from the Java API
and one using two parallel ArrayLists.
In this project you will implement a map using a linked list.
Near the end of the semester we will see a more efficient implementation
of a map using a technique called hashing.
Secondary goals of this project include gaining more familiarity with Eclipse and JUnit.
Keep in mind that this project is running in parallel with Project 2, and they are very different kinds of projects pursuing very different goals of this course. Project 2 requires you to design a set of classes and their interaction, and students' designs will vary considerably; moreover, you are responsible for your own testing. This project, on the other hand, will feel much more like a lab (except that project-quality documentation is required): this description will lead you through a well-defined series of steps, correct submissions to this project will all look very similar, and all the tests are provided for you. Successful students will spread their work on Project 2 over several days as they reflect on the requirements and try out several designs; this project can be done in one sitting.
The screencast demonstration for setting up a project in Eclipse uses this project as an example. Step-by-step instructions are given here as well.
Make a folder for this project and copy the starter code from the course directory:
cp -r ~tvandrun/Public/cs245/proj3/. .
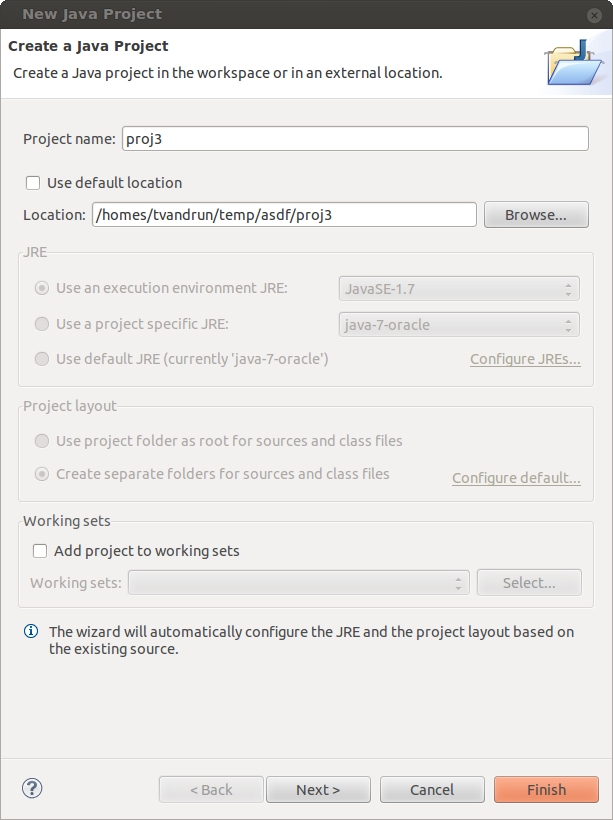
Then open Eclipse and make a new project for this. When you make a new project, be sure that you uncheck the "Use default location" box and that the location you use is the proj 3 folder. Like this:

To make sure you have it right, when you hit the "next" button on the
wizard, the next screen should look like this (note the single hmllm
package, proj3 as the default output folder, no
separate folders for "source" or "bin"):

You'll find three files in the hmllm
package:
HomemadeMap.java, the interface
defining the map ADT; we used this same interface in
class.
HomemadeLLMap.java, a class implementing
HomemadeMap, intended to be a linked-list
implementation.
It contains only method stubs; your task is to finish this class.
HMLLMTest.java, the JUnit test
class for testing your project.
You may also decide to write your own driver
for HomemadeLLMap
to make testing more intuitive for you.
You don't need to turn that file in if you do write one.
Open HMLLMTest.
This is the JUnit test class, containing a sequence of tests
for your project.
You shouldn't modify this file, and in fact you can inspect it
on only an as-needed basis when you need to figure out why tests
fail.
Run the test by a clicking on the green circle-triangle;
Eclipse will determine to run this as a JUnit test.
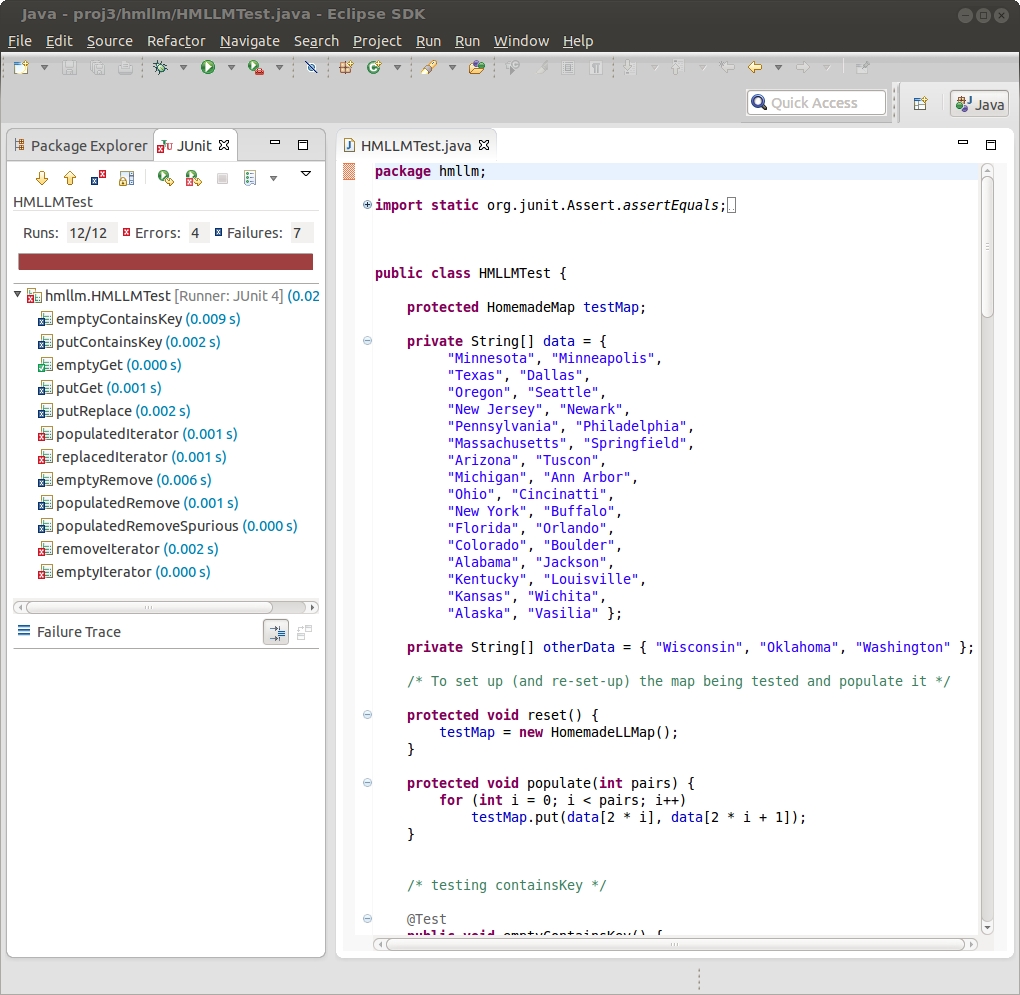
You will see the results of running the tests,
something like this:

(The order of the tests may vary from one run to another.)
You'll notice that one of the tests (emptyGet)
passes out of the box (by luck), but the others all fail.
As you work through the sections below,
your project will pass more and more tests.
You'll know you're done when you get the "green bar".
Now go back to "Package Explorer"
and open HomemadeLLMap.
The main idea is to keep the information about the associations in nodes of a linked list. Each node will contain the information about one association (a key and a value). When a new association is "put" in the map, a new node is added to the list. When a key's value is updated, the appropriate node must also be modified. When an association is removed, the corresponding node must be snipped out of the list. Etc.
Since you're implementing this using a linked list, you'll need a node class. Write one. It can be pretty similar to the examples we've seen in class, except that it will have two "datum" instance variables. Write appropriate getter (accessor) and setter (mutator) methods. Hint: In my in-class examples, I usually do not make the datum instance variable to be mutable. In this case there will be no need to make the key mutable, but it will be convenient to make the value mutable.
Make sure this class is fully documented. Don't get lazy.
What instance variable or variables need to be added
to HomemadeLLMap?
Unfortunately the existence of the node class by itself
and instance variable(s) to HomemadeLLMap
don't change the outward behavior of the HomemadeLLMap
class, so don't bother running the tests yet.
containsKey() methodWrite this method for searching the list for a given key.
Since you haven't implemented put() yet,
at this point we can test this only on an empty list;
rerun the tests (under the JUnit tab, click the icon with the green
circle-triangle and little golden arrow) and make sure
emptyContainsKey passes.
put() methodWrite the method for adding a new association to
this map.
There are two scenarios:
Is this association for a new key not already present in the map
(easier),
or is this a new association for an old key, overwriting a
previous's put value for this key (harder).
When you write this, putContainsKey should pass.
(Unfortunately this does not confirm total correctness of
put(), since its effects on the map
can't be observed until get() is also written.
Did you notice similarity is some of the code of
containsKey() and put()?
Both, if done right, include code for searching the list for
a node with a given key.
Pull this code out into a private helper method that
takes a key and returns a node containing that
key, or null if no such node exists.
Rewrite containsKey() and put()
to use this helper method.
Rerun the tests: this won't make any new tests pass, but you
must confirm that you didn't break anything that was working before.
get() methodNow write the method for retrieving the value associated
with a given key.
In principle this should be very simple because it can use
the helper method you made in the previous step.
However, it's possible that mistakes you made in earlier steps
will become visible now--for example, does put()
work correctly in both scenarios described above?
Rerun the tests:
your goal is the pass emptyGet, putGet,
and putRepalce
in addition the previously passed tests.
keyIterator() method This step will be more challenging than the previous ones.
This method must return an object, and instance of some
class that implements the Iterator interface,
that encapsulates the process of walking over the nodes in
this list and gives access to the keys.
So, you'll need to write such a class;
the keyIterator() method merely
will instantiate that class and return the instance.
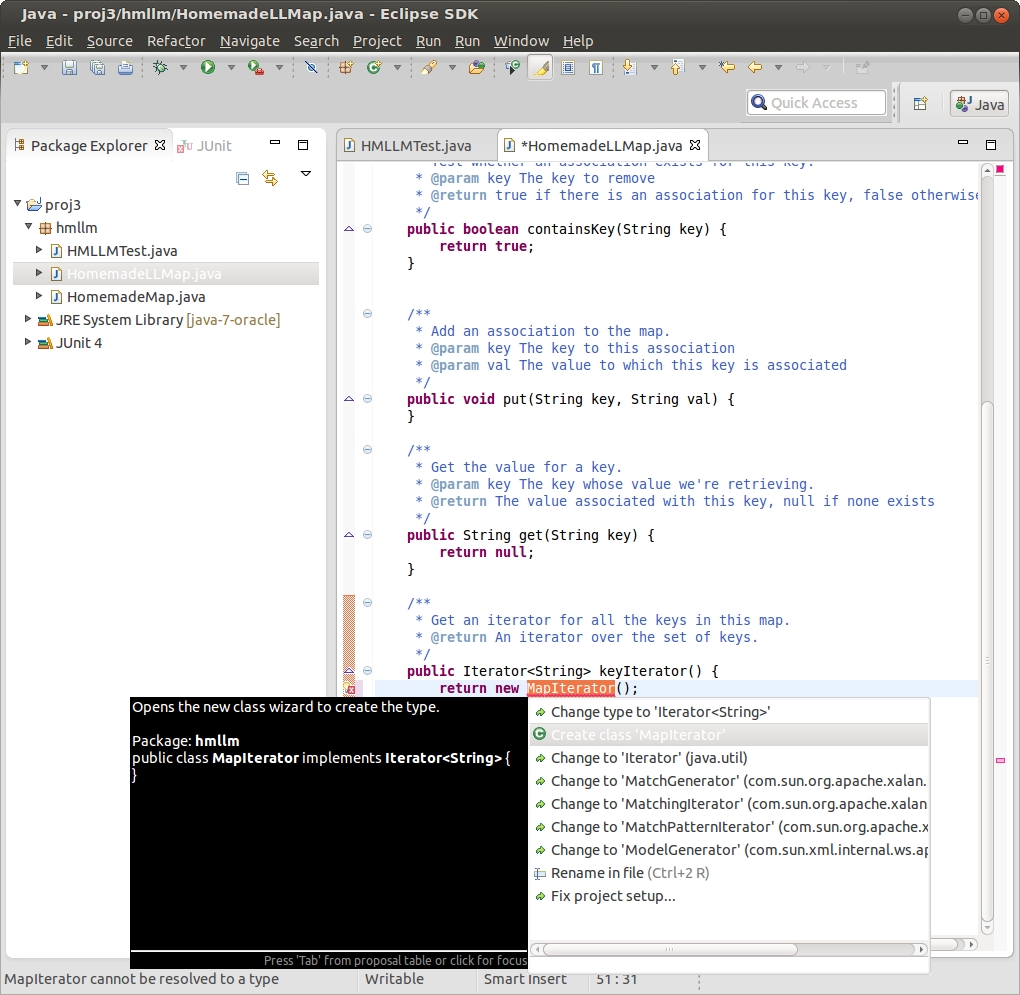
You can use Eclipse to help you get started. Pretend the iterator class already exists and instantiate it. Of course Eclipse will flag that as an error, but if you click on the error thing on the left border of the editor tab, you'll see that one of Eclipse's suggestions is "Create class 'MapIterator'" (or whatever you called the class):

Selecting that suggestion will lead you to a wizard for
making a new class and, eventually, the code for a class that
implements Iterator and has method
stubs already provided.
Finish this class.
(Hints: The remove() method can throw
an UnsupportedOperationException.
If you get stuck on this, the NodeIterator
from the in-class examples is nearly identical to what you need to do
here.
But don't look there unless you are stuck.
You need to think through this one yourself.
Even if you do need to look at the NodeIterator code
from class, take this time to make sure you understand it.)
Also, make sure your new class is properly documented.
The tests emptyIterator, populatedIterator,
and replacedIterator will exercise what you did
in this step.
Make sure these (and the earlier tests) pass.
remove() methodThe last step also is challenging. Given a key, remove the association for that key. This is hard because it requires you to snip out a node. There are five scenarios to think about:
(Just because you have these five scenarios does not mean you will need to check for and have separate code for all five. Once you have mastered the problem you'll notice that elegant solutions can handle several of these seamlessly.)
When this is done correctly, your code should pass
the last four tests (emptyRemove,
populatedRemove,
populatedRemoveSpurious, and
removeIterator, as well as all the
older tests.
No. You still could be docked for incomplete documentation or glaring inefficiencies. (This project description was written to steer you away from glaring inefficiencies, but still....)
Copy the completed HomemadeLLMap.java
file plus the node class and iterator class you wrote
to the turn-in folder for this project:
cp (some file) /cslab.all/ubuntu/cs245/turnin/(your user id)/proj3
DUE: 5:00 pm Friday, Oct 9, 2015. Note that this is the same due date as Project 2.
Clarification of late day policy: The syllabus indicates that students have two late days for projects over the course of the semester---either one project two days late or two projects each one day late. It does not address how weekends days are counted. Here's the deal: If you use late days on a project over a weekend, you have the entire weekend to finish that project, but it consumes both of your late days. That is, if you haven't used any of your late days, you may turn in either Project 2 or Project 3 late (by Monday, Oct 12), but then all of your late days are expended (even if you turn it in on Saturday).
Grading for this project will follow this approximate point breakdown (the right to make minor adjustments in point distribution is reserved):